Boost your home’s worth with smart electrical upgrades from a professional generator company. Learn how upgraded panels, generators, and lights improve value.

Are you interested in generator services? Keep reading to discover the three topics everyone should discuss with their electrician.

The body content of your post goes here. To edit this text, click on it and delete this default text and start typing your own or paste your own from a different source.
Stay protected during outages with help from trusted generator companies. Discover how backup power preserves safety, comfort, and critical systems.
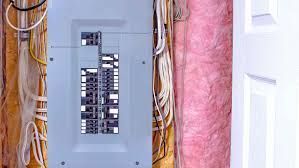
Why Upgrade Your Electrical Panel? 1. Increased Power Capacity – Older electrical panels may not support the energy demands of modern appliances, leading to overloaded circuits and frequent breaker trips. 2. Enhanced Safety – Outdated or faulty panels can pose serious fire hazards due to overheating or arcing. 3. Code Compliance – Electrical codes change over time, and upgrading ensures compliance with current safety standards. 4. Improved Home Value – A new panel can make your home more attractive to buyers and pass home inspections with ease. 5. Support for Home Renovations – If you’re adding a new room, upgrading HVAC systems, or installing a home office, a panel upgrade ensures reliable power distribution. Signs You Need a Service Change or Panel Upgrade • Frequent breaker trips or flickering lights – This could indicate that your panel is struggling to distribute power efficiently. • Fuse box instead of circuit breakers – Older homes may still have fuse boxes, which are outdated and less safe than modern breaker panels. • Burning smell or warm electrical panel – These are warning signs of overheating and potential electrical hazards. • Limited circuits available – If you’re constantly using power strips or extension cords, your panel may not have enough circuits to meet your needs. • Adding high-powered appliances – If you’re installing an EV charger, hot tub, or high-efficiency HVAC system, an upgraded panel may be necessary. The Process of Upgrading Your Electrical Panel 1. Assessment and Planning – A licensed electrician will evaluate your current electrical system and determine the best upgrade solution. 2. Choosing the Right Panel – Options include 100-amp, 150-amp, and 200-amp panels, depending on your home’s power needs. 3. Permitting and Code Compliance – Panel upgrades require permits and must adhere to local electrical codes. 4. Installation and Wiring – The old panel is replaced, new breakers are installed, and wiring is updated as needed. 5. Testing and Final Inspection – The system is tested to ensure safe operation before final approval. Benefits of a Panel Upgrade • Better Energy Efficiency – Reducing strain on your electrical system can lower energy waste and utility costs. • Future-Proofing Your Home – A modern panel allows for future home expansions, EV chargers, or smart home integrations. • Peace of Mind – Knowing your electrical system is safe and up to code provides confidence and security.

Why Getting a Professional Quote Matters
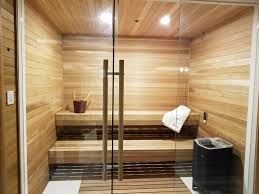
A Comprehensive Guide to Electric Sauna Wiring: Safety, Codes, and Best Practices Installing an electric sauna in your home offers a luxurious wellness experience, but it also involves meticulous electrical work. Proper wiring ensures safety, efficiency, and longevity of your sauna system. This guide walks you through the essential steps and considerations for wiring an electric sauna, whether you're building a new one or upgrading an existing setup. ________________________________________ Understanding Sauna Electrical Requirements 1. Power Supply & Voltage Most residential saunas operate on a 240V, 60Hz circuit. The required amperage depends on the heater's size: • 6–7 kW heaters: Typically require a 30-amp circuit. • 9 kW heaters: Usually need a 40-amp circuit. • Larger heaters: May demand up to 60 amps. Always consult the manufacturer's specifications to determine the exact requirements. 2. Dedicated Circuit Saunas must be connected to a dedicated circuit, meaning the circuit should supply power exclusively to the sauna. This prevents overloads and ensures the sauna operates safely. 3. Ground Fault Circuit Interrupter (GFCI) Protection GFCI protection is crucial to prevent electrical shocks. Install a GFCI breaker in the main panel or a GFCI disconnect near the sauna to safeguard users. ________________________________________ Wiring Materials and Installation 1. Wiring Type • Indoor Installations: Use NM-B (non-metallic sheathed) cable or conduit where necessary. • Outdoor Installations: Employ weather-rated conduit and junction boxes to protect against environmental factors. 2. Wire Gauge Use appropriately rated wires that can handle the required voltage and current. For example, a 10mm² cable is commonly used for sauna installations. 3. Circuit Protection Ensure the sauna circuit is protected by the correct type and rating of circuit breaker (and RCD, if required by local codes). ________________________________________ Safety Considerations • Avoid Installing Outlets Inside the Sauna: Due to the wet environment, outlets and switches should be installed outside the sauna room to prevent electrical hazards. • Use Heat-Resistant Wiring: Select wiring materials that can withstand high temperatures and humidity levels typically found in saunas. • Regular Inspections: Periodically inspect the wiring and connections for signs of wear or damage to maintain safety and efficiency. ________________________________________ Final Thoughts Proper wiring is essential for the safe and efficient operation of your electric sauna. Always adhere to local electrical codes and consult with a licensed electrician to ensure compliance and safety. By following these guidelines, you can enjoy the benefits of your sauna with peace of mind.
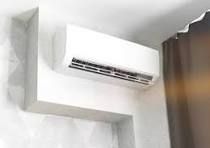
As temperatures rise, there’s no better time to upgrade your home or business with a reliable, energy-efficient cooling solution. At Anchor Electric Contracting Corp, we specialize in the professional installation of mini-split systems and traditional air conditioners, providing comfort and peace of mind for our customers throughout the year. Why Choose Anchor Electric for Your Cooling Needs? With decades of experience in residential and commercial electrical contracting, Anchor Electric is your trusted partner for HVAC installation. We bring the same precision, integrity, and attention to detail that we’ve delivered in every project since day one. When you choose us, you get: • Licensed and insured technicians • Clean and efficient installation • Custom solutions tailored to your space • Competitive pricing and clear communication The Benefits of Mini-Split Systems Mini-split systems are a smart alternative to central air—especially for homes without ductwork, or for adding cooling to individual rooms like: • Home offices • Finished basements • Garages • Additions or in-law suites Mini-splits are: • Energy-efficient: Save on utility bills with zone-specific cooling. • Quiet: Enjoy a peaceful environment while staying cool. • Sleek & compact: Modern wall-mounted units blend seamlessly into your space. • Versatile: Heating and cooling capabilities in one system. • Traditional Air Conditioning Done Right Need a central air system installed or upgraded? We’ve got you covered. Anchor Electric handles everything from wiring and power upgrades to unit installation, all to code and with your comfort in mind. Whether you’re building new or replacing an old unit, we make sure your system is sized and installed for optimal performance. Schedule Your Installation Today Don’t wait for the next heat wave to make a change. Anchor Electric Contracting Corp is ready to keep your home or business cool, safe, and energy-efficient. �55357;�56542; Call us today at 406-251-3166 �55357;�56551; Email: customerconnect@anchorlt.com �55356;�57104; Visit: www.anchorelectricmt.com

The body content of your post goes here. To edit this text, click on it and delete this default text and start typing your own or paste your own from a different source.